ILOM commands

To connect to the system console, at the ILOM command prompt, type:

-> start /SP/console

The start /SP/console command switches you to the system console.
To switch back to the -> prompt, type the #. (Hash-Period) escape sequence.

ok #. 
 
To Activate the Network Management
Port

  1. Connect an Ethernet cable to the network management port.
  2. Log in to the ILOM service processor through the serial management port.
    See the ILOM 2.0 User’s Guide for instructions.
  3. Type one of the following commands:
    • If your network uses static IP addresses, type the following set of commands:

      -> set /SP/network state=enabled
      Set ’state’ to ’enabled’
       
      -> set /SP/network pendingipaddress=xx.xxx.xx.xxx
      Set ’pendingipaddress’ to ’xx.xxx.xx.xxx’
       
      -> set /SP/network pendingipdiscovery=static
      Set ’pendingipdiscovery’ to ’static’
       
      -> set /SP/network pendingipnetmask=255.255.252.0
      Set ’pendingipnetmask’ to ’255.255.252.0’
       
      -> set /SP/network pendingipgateway=xx.xxx.xx.xxx
      Set ’pendingipgateway’ to ’xx.xxx.xx.xxx’
       
      -> set /SP/network commitpending=true
      Set ’commitpending’ to ’true’
      ->


      Note - If you have configured your server to use static IP addresses, but you wish to reset your network to use Dynamic Host Configuration Protocol (DHCP), type the following commands:


      -> set /SP/network pendingipdiscovery=dhcp
      Set ’pendingipdiscovery’ to ’dhcp’
       
      -> set /SP/network commitpending=true
      Set ’commitpending’ to ’true’
      ->
      
  4. Type the following command to verify network settings:

    -> show /SP/network
    

    To connect through the network management port, use ssh to the IP address you specified in Step 3.

Accessing the System Console Through a Terminal Server

The following procedure assumes that you are accessing the system console by connecting a terminal server to the serial management port (SER MGT) of your server.
  To Access the System Console Through a Terminal Server
  1. Complete the physical connection from the serial management port to your terminal server.
    The serial management port on the Sun Netra T5440 server is a data terminal equipment (DTE) port. The pinouts for the serial management port correspond with the pinouts for the RJ-45 ports on the serial interface breakout cable supplied by Cisco for use with the Cisco AS2511-RJ terminal server. If you use a terminal server made by another manufacturer, check that the serial port pinouts of the Sun Netra T5440 server matches those of the terminal server you plan to use.
    If the pinouts for the server serial ports correspond with the pinouts for the RJ-45 ports on the terminal server, you have two connection options:
    • Connect a serial interface breakout cable directly to the Sun Netra T5440 server. 
    • Connect a serial interface breakout cable to a patch panel and use the straight-through patch cable (supplied by your server’s manufacturer) to connect the patch panel to the server.
      FIGURE 1-3   Patch Panel Connection Between a Terminal Server and a Sun Netra T5440 Server


      If the pinouts for the serial management port do not correspond with the pinouts for the RJ-45 ports on the terminal server, you need to make a crossover cable that connects each pin on the Sun Netra T5440 server serial management port to the corresponding pin in the terminal server’s serial port.

      Serial Port (RJ-45 Connector) Pin Terminal Server Serial Port Pin
      Pin 1 (RTS) Pin 1 (CTS)
      Pin 2 (DTR) Pin 2 (DSR)
      Pin 3 (TXD) Pin 3 (RXD)
      Pin 4 (Signal Ground) Pin 4 (Signal Ground)
      Pin 5 (Signal Ground) Pin 5 (Signal Ground)
      Pin 6 (RXD) Pin 6 (TXD)
      Pin 7 (DSR /DCD) Pin 7 (DTR)
      Pin 8 (CTS) Pin 8 (RTS)
    The following table shows the crossovers that the cable must perform for connecting to a typical terminal server..
  2. Open a terminal session on the connecting device, and type:

    % ssh IP-address-of-terminal-server port-number
    

    For example, for a Sun Netra T5440 server connected to port 10000 on a terminal server whose IP address is 192.20.30.10, you would type:

    % ssh 192.20.30.10 10000
    

Accessing the System Console Through a Tip Connection

Use this procedure to access the Sun Netra T5440 server system console by connecting the serial management port (SER MGT) to the serial port of another system (FIGURE 1-4).
FIGURE 1-4   Tip Connection Between a Sun Netra T5440 Server and Another System


procedure icon  To Access the System Console Through the Tip Connection
  1. Connect the RJ-45 serial cable and, if required, the DB-9 or DB-25 adapter provided.
    The cable and adapter connect between another system’s serial port (typically ttyb) and the serial management port on the back panel of the Sun Netra T5440 server.
  2. Ensure that the /etc/remote file on the other system contains an entry for hardwire.
    Most releases of Solaris OS software shipped since 1992 contain an /etc/remote file with the appropriate hardwire entry. However, if the system is running an older version of Solaris OS software, or if the /etc/remote file has been modified, you might need to edit the file. 
  3. In a shell tool window on the other system, type:

    % tip hardwire 
    

    The system responds by displaying:

    connected 
    

    The shell tool is now a Tip window directed to the Sun Netra T5440 server through the system’s serial port. This connection is established and maintained even when the server is completely powered off or just starting up.


    Note - Use a shell tool or a terminal (such as dtterm), not a command tool. Some Tip commands might not work properly in a command tool window.

Modifying the /etc/remote File

This procedure might be necessary if you are accessing the Sun Netra T5440 server using a Tip connection from a system running an older version of the Solaris OS software. You might also need to perform this procedure if the /etc/remote file on the system has been altered and no longer contains an appropriate hardwire entry.
  To Modify the /etc/remote File
  1. Log in as superuser to the system console of a system that you intend to use to establish a Tip connection to your server.
  2. Determine the release level of Solaris OS software installed on the system. Type:

    # uname -r
    

    The system responds with a release number.
  3. Take one of the following actions, depending on the number displayed.
    • If the number displayed by the uname -r command is 5.0 or higher:
    • The Solaris OS software shipped with an appropriate entry for hardwire in the /etc/remote file. If you have reason to suspect that this file was altered and the hardwire entry modified or deleted, check the entry against the following example, and edit it as needed.

      hardwire:\   
       :dv=/dev/term/b:br#9600:el=^C^S^Q^U^D:ie=%$:oe=^D:


      Note - If you intend to use the system’s serial port A rather than serial port B, edit this entry by replacing /dev/term/b with /dev/term/a.

    • If the number displayed by the uname -r command is less than 5.0:
    • Check the /etc/remote file and add the following entry, if it does not already exist.

      hardwire:\   
       :dv=/dev/ttyb:br#9600:el=^C^S^Q^U^D:ie=%$:oe=^D:


      Note - If you intend to use the system’s serial port A rather than serial port B, edit this entry by replacing /dev/ttyb with /dev/ttya.

    The /etc/remote file is now properly configured. Continue establishing a Tip connection to the Sun Netra T5440 server system console. 
    If you have redirected the system console to ttyb and want to change the system console settings back to use the serial management and network management ports, 

Accessing the System Console Through an Alphanumeric Terminal

Use this procedure when you are accessing the Sun Netra T5440 server system console by connecting the serial port of an alphanumeric terminal to the serial management port (SER MGT) of the server.
  To Access the System Console Through an Alphanumeric Terminal
  1. Attach one end of the serial cable to the alphanumeric terminal’s serial port.
    Use a null modem serial cable or an RJ-45 serial cable and null modem adapter. Connect this cable to the terminal’s serial port connector.
  2. Attach the opposite end of the serial cable to the serial management port on the Sun Netra T5440 server.
  3. Connect the alphanumeric terminal’s power cord to an AC/DC outlet.
  4. Set the alphanumeric terminal to receive:
    • 9600 baud
    • 8 bits
    • No parity
    • 1 stop bit
    • No handshake protocol
    Refer to the documentation accompanying your terminal for information about how to configure the terminal.
    You can now issue system commands and view system messages using the alphanumeric terminal. Continue with your installation or diagnostic procedure, as needed. When you are finished, type the alphanumeric terminal’s escape sequence.
    For more information about connecting to and using the ILOM service processor, refer to the ILOM User’s Guide and the Sun Integrated Lights Out Management (ILOM) x.x Supplement for the Sun Netra T5440 Server.

Accessing the System Console Through a Local Graphics Monitor

Though it is not recommended, the system console can be redirected to the graphics frame buffer. After initial system installation, you can install a local graphics monitor and configure it to access the system console. You cannot use a local graphics monitor to perform initial system installation, nor can you use a local graphics monitor to view power-on self-test (POST) messages.
To install a local graphics monitor, you must have the following items:
  • Supported PCI-based graphics accelerator card and software driver
  • Monitor with appropriate resolution to support the frame buffer
  • Supported USB keyboard
  • Supported USB mouse
  To Access the System Console Through a Local Graphics Monitor
  1. Install the graphics card into an appropriate PCI slot.
    Installation must be performed by a qualified service provider. For further information, refer to the service manual for your server or contact your qualified service provider.
  2. Attach the monitor’s video cable to the graphics card’s video port.
    Tighten the thumbscrews to secure the connection.
  3. Connect the monitor’s power cord to an AC/DC outlet.
  4. Connect the USB keyboard cable to one USB port and the USB mouse cable to the other USB port on the Sun Netra T5440 server back panel (FIGURE 1-2).
  5. Obtain the ok prompt.
  6. Set OpenBoot configuration variables appropriately.
    From the existing system console, type:

    ok setenv input-device keyboard
    ok setenv output-device screen


    Note - There are many other system configuration variables. Although these variables do not affect which hardware device is used to access the system console, some of them affect which diagnostic tests the system runs and which messages the system displays at its console. For details, refer to the Sun Netra T5440 Server Service Manual.

  7. To cause the changes to take effect, type:

    ok reset-all
    

    The system stores the parameter changes, and boots automatically when the OpenBoot configuration variable auto-boot? is set to true (the default value).


    Note - To cause the parameter changes to take effect, you can also power cycle the system using the front panel Power button.


    You can now issue system commands and view system messages using your local graphics monitor. Continue with your installation or diagnostic procedure, as needed.
    If you want to redirect the system console back to the serial management and network management ports, 

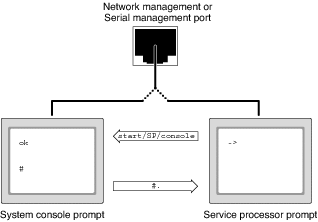
Switching Between the Service Processor and the System Console

The service processor features two management ports, labeled SER MGT and NET MGT, located on the server’s back panel. If the system console is directed to use the serial management and network management ports (the default configuration), these ports provide access to both the system console and the ILOM command-line interface (the ILOM service processor prompt), each on a separate channel (see FIGURE 1-5).
FIGURE 1-5   Separate System Console and Service Processor Channels


If the system console is configured to be accessible from the serial management and network management ports, when you connect through one of these ports you can access either the ILOM command-line interface or the system console. You can switch between the ILOM service processor prompt and the system console at any time, but you cannot access both at the same time from a single terminal window or shell tool.
The prompt displayed on the terminal or shell tool tells you which channel you are accessing:
  • The # or % prompt indicates that you are at the system console and that the Solaris OS is running.
  • The ok prompt indicates that you are at the system console and that the server is running under OpenBoot firmware control.
  • The -> prompt indicates that you are at the service processor.


    Note - If no text or prompt appears, it might be because no console messages were recently generated by the system. Pressing the terminal’s Enter or Return key should produce a prompt.

  To Access the System Console Through a Local Graphics Monitor
  1. To reach the system console from the service processor, type the start /SP/console command at the -> prompt.
  2. To reach the service processor from the system console, type the service processor escape sequence. By default, the escape sequence is #. (Pound-Period).


Graceful Shutdown

The preferred method of reaching the ok prompt is to shut down the operating system by issuing an appropriate command (for example, the shutdown, init, or uadmin command) as described in Solaris system administration documentation.
Gracefully shutting down the system prevents data loss, enables you to warn users beforehand, and causes minimal disruption. You can usually perform a graceful shutdown, provided the Solaris OS is running and the hardware has not experienced serious failure.
You can also perform a graceful system shutdown from the ILOM service processor command prompt using the stop /SYS command.
To Use ILOM set /HOST send_break_action=break, start /SP/console Commands, or Break Key
When it is impossible or impractical to shut down the system gracefully, you can get to the ok prompt, if you have an alphanumeric terminal attached to the server, by pressing the Break key.
  1. Type set /HOST send_break_action=break to force a running Sun Netra T5440 server to drop to a menu:

    -> set /HOST send_break_action=break
    Set ‘send_break_action’ to ‘break’
    -> start /SP/console
    Are you sure you want to start /SP/console (y/n)? y
    Serial console started. To stop, type #.
    
  2. Press the Enter key
    The server responds with:

    c)ontinue, s)ync, r)eboot, h)alt?
    
  3. Type c to get OpenBoot firmware control.
    When init 0 is used, the server drops to this menu:

    r)eboot, o)k prompt, h)alt?
    

    From this menu, you can type o to get OpenBoot firmware control.
    If the operating system is already halted, you can use the start /SP/console command instead of set /HOST send_break_action=break to reach the ok prompt.


    Note - After forcing the system into OpenBoot firmware control, be aware that issuing certain OpenBoot commands (such as probe-scsi, probe-scsi-all, or probe-ide) might hang the system.


    Note - These methods of reaching the ok prompt will only work if the system console has been redirected to the appropriate port. 

Manual System Reset

Use the ILOM service processor reset /SYS command, or start /SYS and stop /SYS commands, to reset the server. Reaching the ok prompt by performing a manual system reset or by power-cycling the system always first attempts a graceful shutdown. If a graceful shutdown is not possible, a forced shutdown is performed. A forced shutdown results in the loss of all system coherence and state information. A forced system reset could corrupt the server’s file systems, although the fsck command usually restores them.


Caution - Accessing the ok prompt suspends the Solaris OS. You cannot return to the Solaris OS without rebooting the OS, for example with the boot command.

Graceful Reset of the Control Domain With ILOM reset Command

Use the ILOM reset command to gracefully reset the control domain and obtain the ok prompt. If a graceful shutdown is not possible, a forced shutdown is performed. To use this method to obtain the ok prompt, you must first set the control domain auto-boot? option to false.
  To Obtain the ok Prompt
  1. Decide which method you need to use to reach the ok prompt.
    See OpenBoot ok Prompt for details.
  2. Follow the appropriate instructions in the following table.
    The following table describes ways of accessing the ok prompt.

    Access Method What to Do
    Graceful shutdown of the Solaris OS From a shell or command tool window, issue an appropriate command (for example, the shutdown or init command) as described in Solaris system administration documentation.
    Break key From an alphanumeric terminal configured to access the system console, press the Break key.
    ILOM commands From the -> prompt, type the set /HOST send_break_action=break command. Then issue the start /SP/console command, provided the operating system software is not running and the server is already under OpenBoot firmware control.
    Manual system reset From the -> prompt, type:
    -> set /HOST/bootmode script="setenv auto-boot? false"
    Press Enter.
    then type:
    -> reset /SYS
    Graceful reset of the control domain using the ILOM reset command From the -> prompt in the control domain, type:
    -> set /HOST/domain/control auto-boot=disable
    -> reset /HOST/domain/control

Comments

Popular posts from this blog

BMCs and the IPMI Protocol

Logical Domains Reference Manual

Understanding How ZFS Calculates Used Space